
Color or B&W Long Exposure Photography, and new course ideas…

We’ve had the most intense storms in Florida. August is notorious for stormy weather, before the rain, beautiful clouds develop. It’s hard to resist taking a few photos using long exposure techniques to blur the clouds and water. This exposure was 75 seconds using a 10 stop neutral density filter and three stop reverse graduated neutral density filter. I liked the vertical presentation for this particular cloud formation. Rather than freezing action with a short exposure, the clouds and water find their own path during the long exposure time, which is a lot of fun and serendipitous. This gives the image a painterly look without the need for creative post processing. I’ll be anxious to see how fast the clouds move in the spring compared to summer.
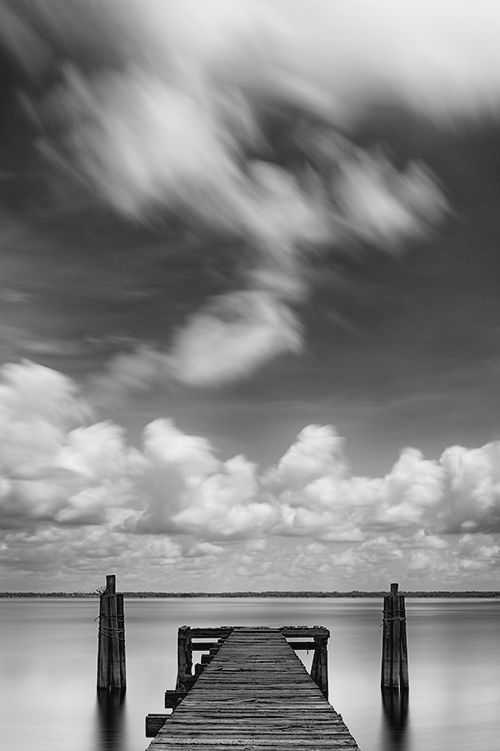
I’m working with the Lee Big Stopper and three stop reverse graduated neutral density filter. This combination works well with the type of image shown above. A few tips, make sure the Big Stopper is seated snugly against the Lee Foundation holder so that there is no light leakage around the edges. Close the eye piece shutter if possible (or use gaffers tape). You can position the reverse grad by using Live View and match it to the the horizon line. Very easy! Use a cable release, sturdy tripod, and calculate your exposure by creating a test shot. The hardest part is deciding color, or black and white. Color connotations – blue is generally a calming effect, while black and white has a fine art look. I’m deciding on my favorite. Both tell different stories so please let me know what you think!
Very little post processing is needed. With the color image, I used Viveza in select areas for color and contrast adjustments, and darkening an area on the dock. I also like using Pro Contrast in Nik Color Efex Pro. The ability to control highlights and shadows is very helpful. For the black and white image, I used Nik Silver Efex Pro, starting from one of my favorite presets Full Dynamic for conversion, and fine tuning the adjustments from there.
Some of my BetterPhoto.com students are asking if I’ll be writing a course on long exposure techniques, or doing a workshop. The answer is YES! This will be a lot of fun and we could incorporate a few other ideas such as balancing light using neutral density filters, photographing stars, star trails, capturing taillight streaks from passing cars, and photographing beautiful nightscapes. We won’t be limited to just low light shooting. The images above were taken in the middle of the day. If you have any ideas on topics regarding long exposure techniques you’d like to see in class, let me know what your interests are in the comments section, or drop me an email. You can reach me on Facebook and Google+ too!

This lightning strike was photographed with my iPhone using an app called Strike Finder during a big summer storm yesterday. It works fairly well, we had some intense lightning over the course of several hours, close and very loud! Try this with your iPhone, and use MK Controls Lightning Trigger for high quality imagery of captured lightning. Have fun shooting! ~ Deb


Hi Deb. Fabulous shot…as always! I am biased toward B&W, so I think that image is the most stunning of the two.
You mentioned using a Grad ND filter below the color image and then a reverse Grad ND filter below the B&W image. Based on the time of day, I would have thought the standard Grad ND filter would be the choice.
Just wondering while I wait for my Big Stopper ND filter to come in. I really enjoy your blog!
Thank you Gary! I like the B&W version too. 🙂 The images are exactly the same, the second is just converted to B&W. A reverse grad was used in addition to the 10 stop neutral density filter. Thanks for letting me clarify! The image begins to lose detail at the horizon line and gradually gets darker towards the top of the frame, the reverse graduated ND filter balances the light in the right places, and corrects the overall exposure. Using a different lens, or a different composition might call for the standard grad. It’s good to have both. Hope your Big Stopper comes in soon!